Shannon Carnevale
  • Home
  • About Me
    • Professional Bio
  • Showcase
    • Stock Photography Portfolio
  • Contact Me

Bookplates, not for the faint of heart

9/10/2014

 
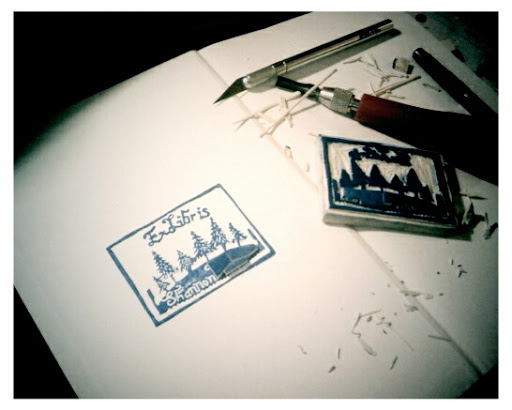
Last night, I made something I have been lusting over in etsy for months. I spent just under $3 in materials (granted I already had $7 in supplies from previous stamps) and got something I wanted to buy for $35 on etsy. Did I do this to avoid purchasing something expensive from another crafter? Absolutely not. I'll admit, I thought $25-$35 was a bit high for what they were selling, but the main reason I made my own was I couldn't find a design I liked. I would be using it for professional purposes and needed something related to forestry

I made a bookplate. For those of you wondering what a bookplate is, it is a traditional means of placing ownership on a book.
Traditionally, Bookplates are made by carving a block of wood or metal and then inking and pressing onto a piece of paper to then be pasted into a book. Sometimes they were simply inked onto the book themselves. I have not decided if I like the "pasting" method, I feel that someone can take your bookplate out if they dislike it, and more importantly - it could age and fall out. I will be using the method of stamping the inside cover, unless the inside cover is of a pattern, in which case I will print on a piece of paper and paste it in.

To make the book plate above, I bought a piece of stamping rubber, some carving tools, and a new exacto knife. The process was relatively simple even if it wasn't easy.  Because of my forestry background, I went for a traditional bookplate shape and text. I incorporated an evergreen tree outline, a crosscut saw, and a scripted font.

It took me approximately an hour to carve, plus design time. It was very difficult to carve such a detailed stamp (I have only made 3 stamps prior!) but worth the time. This was a painful, tedious, and lengthy process but I am so glad I did it. I now have a bookplate that represents my career path and puts ownership on my many reference books. Had I not been so determined to make my own, I would commissioned a piece from one of the artists on Etsy.

How to carve a book plate:

  • Draw or print the design you would like to carve, It's best if it is a flat design (black and white). 
    • Pro Tip: Don't jump right into cursive letters or complex designs. Start with some fun little stamps like a strawberry or a basic animal outline. If you really want to make it a bookplate your first time, I recommend starting with large block letters.
  • Using pencil, trace around the design and color in all of the black (or white). The parts you color will be the parts you carve. 
  • After coloring in the design with pencil, lay your carving rubber over the traced design and press hard without letting the pattern move. You can use a rubber brayer or the palm of your hand to "roll" the pattern onto the rubber. The graphite from the pencil should have transferred onto the rubber you plan to carve, mirrored. 
    • There are almost always sections that don't transfer. Simply use your pencil (dull is best, sharp points will tear the rubber) to fill in the blanks as needed.
  • Using your linoleum cutting set, start to carve out the design. This is tedious, but kind of soothing at the same time. Be patient with the carving and take breaks as needed. The more tired your wrist and hand, the sloppier the carving will be. 
    • Pro Tip: carve out only a couple millimeters of rubber at first and choose a design that doesn't have large voids. This will reduce the chance of your stamp being flimsy.
  • When you have carved out the design, test it by stamping it on some paper. Check your stamp's design and make note of areas you need to carve out more. 

And, that's it! If you have any questions, let me know!

Darby Smart Promo Code! (Limited Time only)

If you order supplies to make this project from Darby Smart, use promo code: yyqyry25 to get 25% off!  (expires 3/20/2016)
  • Link to project: http://www.darbysmart.com/projects/carve-your-own-bookplate 
This is a repost from my now defunct blog "Sew Thrifty". Before shutting down the blog, I wanted to save my favorite posts here. I still use all of these items and love them. Originally posted: Sept. 2010

    The
    Pathless
    Woods

    I'm Shannon.
    Let's go somewhere.

    Categories

    All
    Breweries
    Camping
    Camping Cuisine
    Conferences
    Crafting
    Extension
    First Time Homeowner
    Food
    Hiking
    Hurricane Season
    Invasive Species
    Office Supplies
    One Word
    Outdoor Gear
    Outreach
    Professional Development
    Travel
    Wildlife
    Words To The Wise

    Enter your email address:

    Delivered by FeedBurner

    Archives

    December 2016
    July 2016
    March 2016
    September 2015
    August 2015
    April 2015
    March 2015
    February 2015
    January 2015
    November 2014
    October 2014
    September 2014
    August 2014
    July 2014

    View my profile on LinkedIn
    Ebates Coupons and Cash Back

    RSS Feed

Powered by Create your own unique website with customizable templates.
  • Home
  • About Me
    • Professional Bio
  • Showcase
    • Stock Photography Portfolio
  • Contact Me